Using the LoginTC REST API
August 09, 2013 •
Our mission at Cyphercor is to provide universal multi-factor authentication for all applications from VPNs to Unix installations to web applications. To achieve this mission we have built a powerful REST API that allows you to issue LoginTC authentication requests and check the response (i.e. was it successfully approved or denied). The API also allows you to perform common administrative tasks such as managing users, domains, and tokens.
To make it easier to consume the LoginTC REST API, we have built client libraries for Java, PHP, and C, all of which are open source and available on GitHub. You may include these client libraries directly in your applications and websites to manage your LoginTC domains, users, tokens, and authentication sessions.
API Resources
The API lets you create several important resources.
- User
- A user represents a person or an account. A user may belong to many domains and have many tokens. A LoginTC user object generally corresponds one-to-one with your application’s user object.
- Domain
- A domain represents a service (e.g. VPN or website) and contains a collection of users and token unlocking policies (e.g. key, passcode, minimum length).
- Token
- A token is a LoginTC credential tied to a domain and user pair. The LoginTC credential lives on the LoginTC mobile app on the user’s mobile device.
- Session
- A session is an authentication request sent to a user. Creating a session initiates a push notification to the user’s mobile device. See Multi-Factor Flow for more information.
For a complete specification of permitted operations on these resources, visit the REST API specification.
Example (Adding User to Domain)
The following example (using the Java client) creates a new user (john.doe) and adds it to a domain.
String apiKey = "zoqWOJIeNNsQUPnPtiRjbpb2tm9jV9M1vHCMGImt22SV4lMLvuuIkl4giwRKZcZN";
String domainId = "5340154b751da210542facd75ef8f2a6ba6dc305";

LoginTC client = new LoginTC(apiKey);

// create the new user
User user = client.createUser("john.doe", "john.doe@example.com", "John Doe");

// add the new user to the domain
client.addDomainUser(domainId, user.getId());
Example (Authentication)
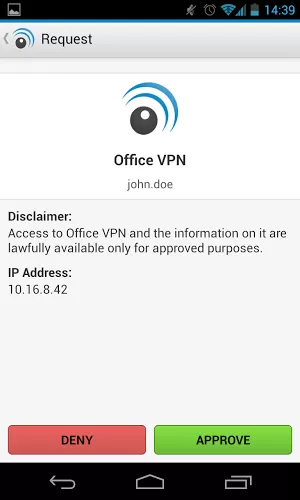
The following example (using the Java client) sends a LoginTC authentication request to the user john.doe with custom attributes: IP Address, and a disclaimer. Custom attributes may be anything that you feel will help your users decide if they should accept or reject the authentication request. The example then polls for the authentication response until the user acts on the authentication request or until a timeout occurs.
String apiKey = "zoqWOJIeNNsQUPnPtiRjbpb2tm9jV9M1vHCMGImt22SV4lMLvuuIkl4giwRKZcZN";
String domainId = "5340154b751da210542facd75ef8f2a6ba6dc305";

LoginTC client = new LoginTC(apiKey);

long time = System.currentTimeMillis();
long timeout = 60 * 1000;

// set custom session attributes
Map<String, String> attributes = new LinkedHashMap<String, String>();
attributes.put("Disclaimer", "Access to Office VPN and the information on it are lawfully available only for approved purposes.")
attributes.put("IP Address", "10.16.8.42");

Session session = client.createSessionWithUsername(domainId, "john.doe", null);

login: while (System.currentTimeMillis() - time < timeout) {
    session = client.getSession(domainId, session.getId());

    switch (session.getState()) {
        case APPROVED:
            System.out.println("Approved!");
            break login;
        case DENIED:
            System.out.println("Denied!");
            break login;
        case PENDING:
        default:
            System.out.println("Waiting...");
            break;
    }

    Thread.sleep(1000L);
}
Custom attributes are displayed on the LoginTC request decide window: